Dave’s Motion Detector
Dave’s Motion Detector (DMD) is a robust motion detector for analysing videos to extract action scenes. I have tried for years to write an automatic version but it could never cope with changing light, moving background or other distractions. DMD instead relies on the human eye which is remarkably efficient at recognising small changes to a scene.
DMD works by presenting a grid of video thumbnails on screen. The user can see at a glance where an event occurs and can click to mark the in and out frames for each event. DMD then generates a ShotCut video file comprising all events with an optional dissolve between them.
This may seem a long winded approach but it has some great advantages:-
- No false positives or missed events – ever.
- User can select only events of interest – e.g. only robins at bird feeder.
- Human eye is fantastic at spotting movement.
- User can ignore events – e.g. rain on lens, etc.
- Hours of video can be analysed in a few minutes.
DMD can be downloaded here.
Preparation – Set your camera to record video continuously and then transfer these video files into a dedicated folder on your PC.
Create Thumbnails

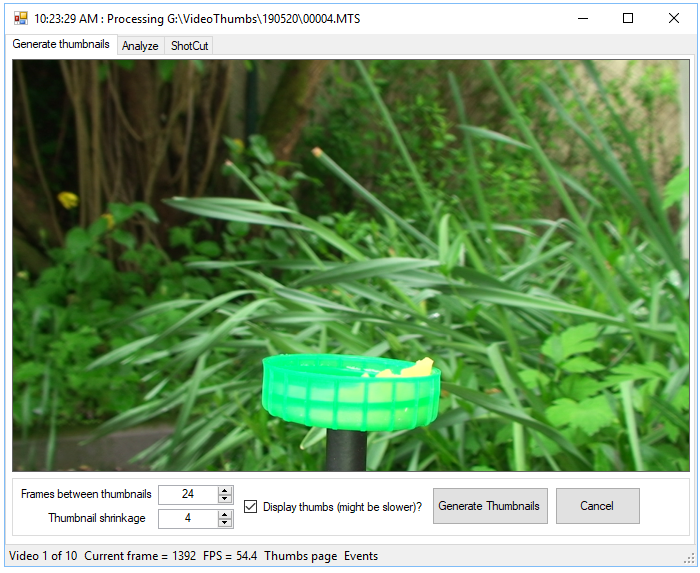
Adjust the frames between thumbnails entry to suit your videos. Reducing the number of frames between will result in more thumbnails to view but will be more accurate. 1 thumbnail per second of video is a good starting point.
The shrinkage entry determines the size of the thumbnail on disk. A setting of 4 means the thumbnail width and height will be 1/4 of the video frame size.
Click the Generate Thumbnails button and select the videos to process. You can display the thumbnails as they are generated but this slows down the process. You can also cancel at any time.
The thumbnails will be stored in a folder called “thumbs” inside your videos folder.
You may see an error message regarding an unhandled exception during thumbnails generation. This is outside my control. Just click the Continue button and DMD should finish the generation process. Then close and restart DMD to analyze the results.
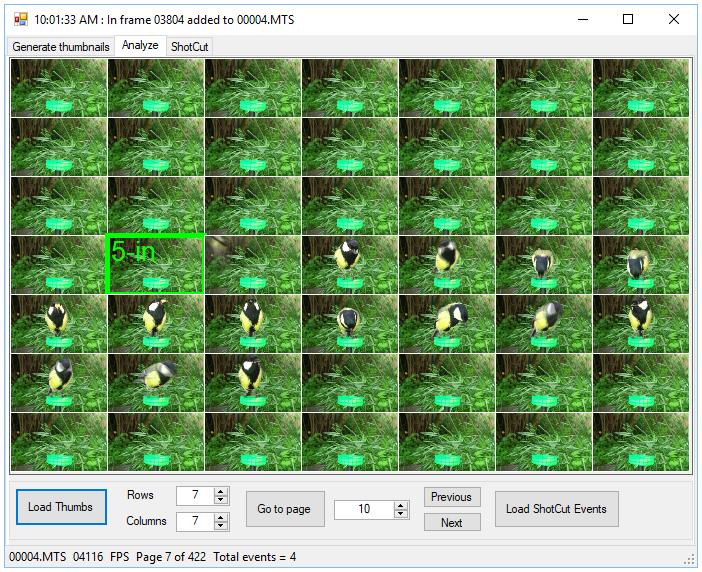
Analyze Videos – Once your thumbs are generated click the Analyze tab and then the Load Thumbs button. DMS will then display the first page of thumbs. You can adjust the number of rows and columns to suit.
You can move between the pages of thumbs using these keyboard shortcuts:
- Next page = Space or Page Down or Down Arrow
- Previous page = Page Up or Up Arrow
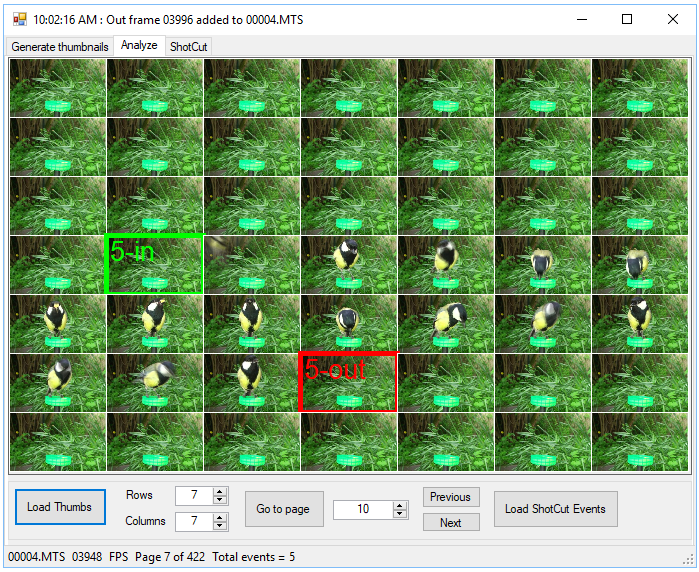
The thumbs are arranged from top left to bottom right. When you see an event, left-click on the thumb immediately before it. The thumb will be outlined in green and show the event number.

Right-click on the thumb immediately after the last thumb of an event. It will be outlined in red.

You can review your events using the left or right arrows or Next or Previous buttons to move between events. Left clicking on a green thumb (or right-clicking a red) will delete that event.
The Load ShotCut Events button will load the events from an existing ShotCut file which you can then edit. Re-save your new events using the ShotCut tab.
You can invert the thumbnails and/or change them to monochrome using the relevant check boxes. Inverting can help with subjects like meteors and monochrome helps where too much color is a distraction. The stored thumbnails are not affected by these changes.
Region of Interest (ROI) – The ROI tab allows you to define a rectangular region of interest within your thumbnails. You can use this to select the entrance to a birdbox, cash register, etc. This makes it much easier to spot events on the thumbnails page and means you can squeeze more thumbs into each page to speed up the analysis.
To specify an ROI, click on the ROI tab after you have loaded the thumbs. Use the bottom slider to scan thru your thumbs. Left click and then right click on opposite corners of the ROI and it will be shown as a green rectangle. Click the Clear ROI button to remove the ROI. The stored thumbnails are not affected by the ROI.
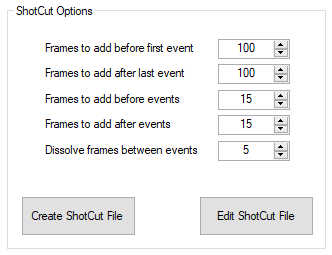
ShotCut Videos – Click the ShotCut tab to show the ShotCut video editor options. You can set the number of frames to add before or after each event as well as the number of frames to dissolve between each event.

Once you are happy, click the Create ShotCut File button to save the file. The file name will consist of the video folder name plus the number of events plus the ShotCut variables you chose. You can also edit an existing DMD ShotCut file using the edit button.
In ShotCut you can click Open File to load all the events and dissolves. ShotCut sometimes stumbles with huge files but restarting it usually solves the problem. You can also click File>Open MLT XML as clip to load the file as a single clip. This is easier if you want to add filters.
Note that DMS autosaves a ShotCut file called “0temp.MLT” as you analyse your thumbs which you can use as a recovery backup.
Tips and Tricks
- Set up your camera so the background is not too cluttered to make it easier to spot events.
- Manually focus your camera on the target location so the lens doesn’t hunt for focus between events.
- Analyze your thumbs on a giant TV so you can get hundreds of thumbs per page.
- Use an SSD for faster thumbs loading.
- Make sure your videos are numbered sequentially or the thumbs will be out of sequence. I use Advanced Renamer to renumber my CCTV clips before running DMD.
- Ensure that the ShotCut>Settings>Video Mode has exactly the same framerate as your analyzed files or the clips will be wrong or even missing. Note that 29.97fps is not 30fps!